Saturday, March 31, 2018

Trying my hand at new craft projects "Crochet"

I've always been a crafty person.  My mom was a sewer, sewing all us girls frilly dresses.  "Get-er-done" is what my husband has branded me with.  So naturally I am always looking for something new to learn.  I started crocheting when my own girls were born but fell away from the craft for many years.  Now that retirement has set in and we travel quite a bit I've picked it up again.

The Internet has been a great source for finding FREE patterns and You-tube videos are a must.  I found this first one "Crochet Flower Potstand" on lindevrouwsweb.blogspot.com and what a challenge it was.  But I loved the colors she used and have made so many of these since finding.  Here are just a few.


My first amigurumi crochet challenge was this little "Nosy-Kitty".  I found her on www.lilleliis.com and it was free as well.  Super cute and EASY to follow.


Love seeing all the awesome crochet projects people are doing.  It amazes me at how very talented and creative these people are.  So now I'm on the hunt for a new project and expanding more brain cells.

Friday, March 30, 2018

Kitchen Remodel back in Florida

For years I've been wanting to replace my countertops.  When we purchased the house in '99 these pink formica countertops and pickled oak cabinets were so great.  Fast forward almost 20 years and they're not so fantastic.  The day finally came in November 2017 when I suggested we go shopping for NEW COUNTERTOPS.  After a few box store excursions my hubby suggested we make our own. "What, make our own!"  Yes sir, that's what we did. 

We've been making some furniture and farmhouse decor for a couple of years (mostly having fun) so I knew we could do it but the time and mess was not what I was looking forward to, at all.  So demo began with the old cabinets getting a new coat of paint and tile and sheetrock coming down.  A real setback was when we discovered mold behind the kitchen sink, UGH.  But after fretting a couple of days about who to call and what to do, we dove in and ripped out the old and put in the new.  Check out the demo progress:

Before reno with pink countertops


Mold problem on sheetrock and back of cabinet

Sheetrock replaced, what a messy job!

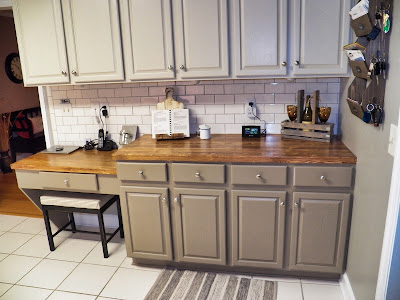
We made the countertops our of 2x6 pine lumber.  Our process in short; we trimmed the sides of each board, drilled holes for dowels and glued and clamped together.  Many, many hours of sanding, staining and coats (around 4) of Daly's Crustal Fin sealer they were ready to install. 

Photos before stain and sealer; measuring for sink cut-out

After several weeks of washing dishes in the bathtub, I have a huge THANK-YOU for the individual that invented indoor plumbing.  I never realized how much I actually used that kitchen faucet until it was gone!!!  So after many messy, dusty and inconvenient hours we are FINISHED, though, done,  complete with the kitchen renovation.
Here are the photos of the completed kitchen.  I am so very pleased with how it looks and my husband is still speaking to me.  He says I', BOSSY!


What's for dinner tonight?  Oh let's go out, I don't want to mess up the new kitchen!!!😄


Saturday, January 10, 2015

Fun to make…COWBOY Cooler.

Cowboy cooler made from pallet wood.  We made this for a christmas gift.  What fun, so easy to make and the recipient loved it. The wood was free so all we had to purchase was the cooler, a bottle opener for the side, drain faucet and embellishment for the front.  You can find this easy plan on:  http://www.homerepairtutor.com/how-to-build-a-rustic-cooler


Sunday, December 21, 2014

Spring is in the air! Another bedroom complete in the Casa!

Fall has come out with all it's splendor and we're back in God's country, North Georgia Mountains.  The weather is awesome and on this trip we had some family come for a few days.  We were able to spend a little time showing off the area and exploring some things we had yet to see.  Usually we are so focused on working on our house, trying to fit as much in as we can in such a short time.  We hit the changing of the leaves at a perfect time.  How beautiful the forested mountains were and the crisp, cold air was a welcome relief from our Florida humidity.

As for our Georgia home, we have made quite a dent in the finishes.  We now have three bedrooms finished and are now ready to start furnishing the third one.  Check out the before and after photos of this room.  We started out with a brown gloomy room with mixed matched wall materials and partial laminate floors.  We ended up tearing down one interior wall and replacing with wood from pallets, then whitewashed them and painted the baseboards and door with a light gray, as the pallet wall ended up with a bit of a gray hue.  The floors were replaced with tongue and groove pine that we left natural and coated with numerous applications of sanding and polyurethane.  The floor was  not too difficult to put down but the smell from the polyurethane was terrible.  All in all, it looks great. 
Take a look at the progress below:

Before


Here's the room finished and decorated.  I had so much fun putting this together.  This was a real budget friendly room and turned out so amazing.  Drapes are drop cloths that I smocked at the top (sorry did not get a close up of this).  Picture was one I took, enlarged and framed; repurposed an old hand-me-down chair with yellow paint and crocheted the throw at the end of the bed.  The bed, night table, wall shelf, mirror and desk we made as well out of pine lumber.  

After

After

Here is a picture of the stand we made for this bedroom that is not seen in this photo.  Super easy and again made from pine lumber.  I cannot take credit for the idea itself, normally my go-to is Shanty-2-chic.com and Ana-White.com.  Two wonderful sources for free plans.

It took a couple of re-dos on the wall color and getting that "just the right touch".  We're open for company now with three bedrooms complete.  Now on to room No. 4. 

Hope you enjoyed my update.  More project completions to come at Home Made In Georgia!


Saturday, March 1, 2014

How to Make Flavored Tea Bags

How to Make Flavored Tea Bags

This looked interesting.  I am not much of a tea drinker but there is a lot  being claimed about the health benefits.  I think I'll try this.http://www.town-n-country-living.com/how-to-make-flavored-tea-bags.html

Tuesday, February 25, 2014

Items ready for Two Sisters New Beginnings


What a beautiful day it is outside today, feels like spring.  I just finished working in the workshop on 2 items I'll be carting over to Two Sisters New Beginnings to see if they can sell for me.  Here are a couple of pics of these projects:


Shabby Chic wood serving tray I made out of scrap wood left over from other projects.  I whitewashed and added drawer handles.  This was really fun and so easy.


This is the 2nd wine rack I have made for them.  The first one sold at Christmas.  This was made from scraps as well.

Well that is all my projects for now.  Next thing hubby and I are going to tackle will be a bathroom vanity for the upstairs bath in our North Georgia home.  For now, I am going out in the yard and enjoy this beautiful sun…Thank you God for such a glorious day…  Check our Two Sisters: http://www.twosisters-newbeginnings.com

2014 - New Year, New Things

We've been back in Florida for the winter.  Way too cold up in North Georgia.  Much has taken place during December '13.  My father passed away at 90 years of age.  He lived a long and healthy life but struggled for the last 3 years with that terrible disease we all know as Alzheimer's.   Three weeks after my father's passing my stepmother (his caregiver) took ill and had to have some pretty serious surgery.  During all this I have been back and forth to and from Pensacola helping care for both of them.  Now, PRAISE GOD, she is getting back on her feet and doing better each day.  So things are beginning to slow down for me, somewhat.

Now for some fun stuff!  During my spare time I've been doing some small wood projects which I've been selling at a wonderful little shop in Monticello.  If you've not been there and you are local, you need to check out "Two Sister's New Beginnings".  They have lots of fun, eclectic, shabby chic, things in their store.  All items are made from local folks like myself.  Monticello, Florida is really growing in the little square with quite a few little shops and cafes,  It's a really fun way to spend a Saturday morning with just the girls.

Well, here are a few of the things I've been making:
Shabby Chic Shelf….
Smaller shelf with towel hook….

I mounted this hand towel ring on a piece of wood to give it more character….

I updated the guest bath, which was so badly needed.  The original had a blue and pink floral vinyl wallpaper and ugly pickled oak stained cabinet.  There are actually 2 rooms, 1 houses the lavatory and the other the tub and toilet.   I sanded down the vanity cabinet and painted them white.  What a huge difference this made.  It took me 2 days to remove all the wallpaper, 2 more days to patch the existing sheetrock of all nail holes and tares; and then put a texture on the walls.  2 more days to paint both areas.  All in all, it was a good 2 week project but now it looks great.  Totally amazing what paint can do…Yea!

Pics of the finished bathroom. I did NOT make the little table, it just seemed to fit the space.


Check out "Two Sisters New Beginnings, LLC" website on Facebook:       https://www.facebook.com/pages/Two-Sisters-New-Beginnings-LLC/654957354515489

Monday, October 28, 2013

Fireplace has a new look!


So happy with the new look of the fireplace and chimney.  The wall around, above and beside the fireplace was never completed.  We added bricks just above and on the sides of the fireplace, a mantel and completed the wood up the chimney.  Looks great with the trim and wood.  We also completed the trim around the windows.  WHEW!


Fireplace needing some serious help!


Completed....YEAH!
Lots of hard work here, but my Hubby never ceases to amaze me.

Homemade Master Bedroom Furniture

Finally able to get a few photos of the bedroom suit we built for the house.  We found these plans on a great site from Anna White.  We made a platform bed and added a farmhouse headboard.  Along with the bed we made 2 small bedside cabinets.  I stained these with a stain with sealer in a color called espresso.  Now that I have had my first real experience with stain, I find I really do not like the stain/varnish product.  I found it a lot harder to manipulate the color due to the varnish.  All in all, they turned out really nice and fit our rustic decor with all their imperfections.


Building this set ourselves and using pine of various sizes, we saved on the cost of furnishing this bedroom considerably.  I shopped online for the linens and window dressings and found some pretty good bargains on closeout sales at West Elm.  

Laundry Closet Doors Intalled...

Well finally got the new barn doors hung for the laundry closet.  They look great and were pretty right on with our measurements.  We had some tweaking to get them hung but all in all were pretty easy.  Here is a pic of the before and after.


We found this plan for the barn doors on the internet.  Not only does this look better but the dryer is a lot less noisy.  
Love this FALL WEATHER!

Monday, October 14, 2013

Great weather for traveling to North Georgia!


Heading to our favorite place, Northwest Georgia. We are in the process of renovating a home we purchased a year ago. Me and hubby love DIY projects. We found a home that was never completed on the inside. This find was exactly what we were looking for. So each month, we are both retired, we travel there for a couple of weeks and we WORK!!! We LOVE it, actually. This will truly be our "homemade" home as we are DIY. From interior finishes to building our own furniture, with the exception of a couch....too hard. Here is a pic of the home when purchased. The entire ceiling will be pine up three floors (way up there). The entire kitchen and master bedroom had to be insulated and sheet rock hung. We have completed these, thus far. This trip we'll be hanging the laundry room doors which we build to look like barn doors. Will add pics on next posting.